
Browsing the Library
Esta página aún no está disponible en español. Se muestra la versión en inglés.
The Library holds everything a workspace knows: the files and tables you’ve brought in, plus the collections, questions, views, KPIs and facts built on top of them. This page covers List mode, which lays all of that out as tabs and tables.
Who can see this: everyone with access to the workspace. Adding, renaming, moving and trashing files needs permission to manage the workspace.
Leer la transcripción
Why the same question gets different answers
Ask two teams for last month’s revenue, and you get two different numbers. And nobody can say where either one came from. That happens when everyone calculates things their own way. Querri gives everyone one place to start: the Library, where your data lives and where it gets its meaning.
Bring files and sources into the Library
It starts with your data. Upload files from your computer, or connect sources like Google Ads, NetSuite, or Salesforce to pull their tables in.
What is a view?
Next come views. A view is data that’s already cleaned, prepared, and precalculated, with your business rules built in, like leaving unpaid orders out of revenue.
What are collections and metrics?
Collections organize it all by topic. Each one is anchored by a business question, with follow-up questions and the views that answer them underneath. The Metrics tab holds the numbers your business tracks. Each one is defined once, with a formula, so everyone calculates it the same way.
See how the Library connects
To see how it all fits together, switch to Visualize. Your connectors, files, collections, metrics, and facts sit on one map, with lines showing how they connect.
Ask your librarian about the Library
Have a question about the Library itself? Ask your librarian. Querri’s librarian can tell you which collections you have, what a view contains, or how a metric is defined. When anyone asks Querri a question, it checks the Library first. So everyone gets answers built on the same definitions.
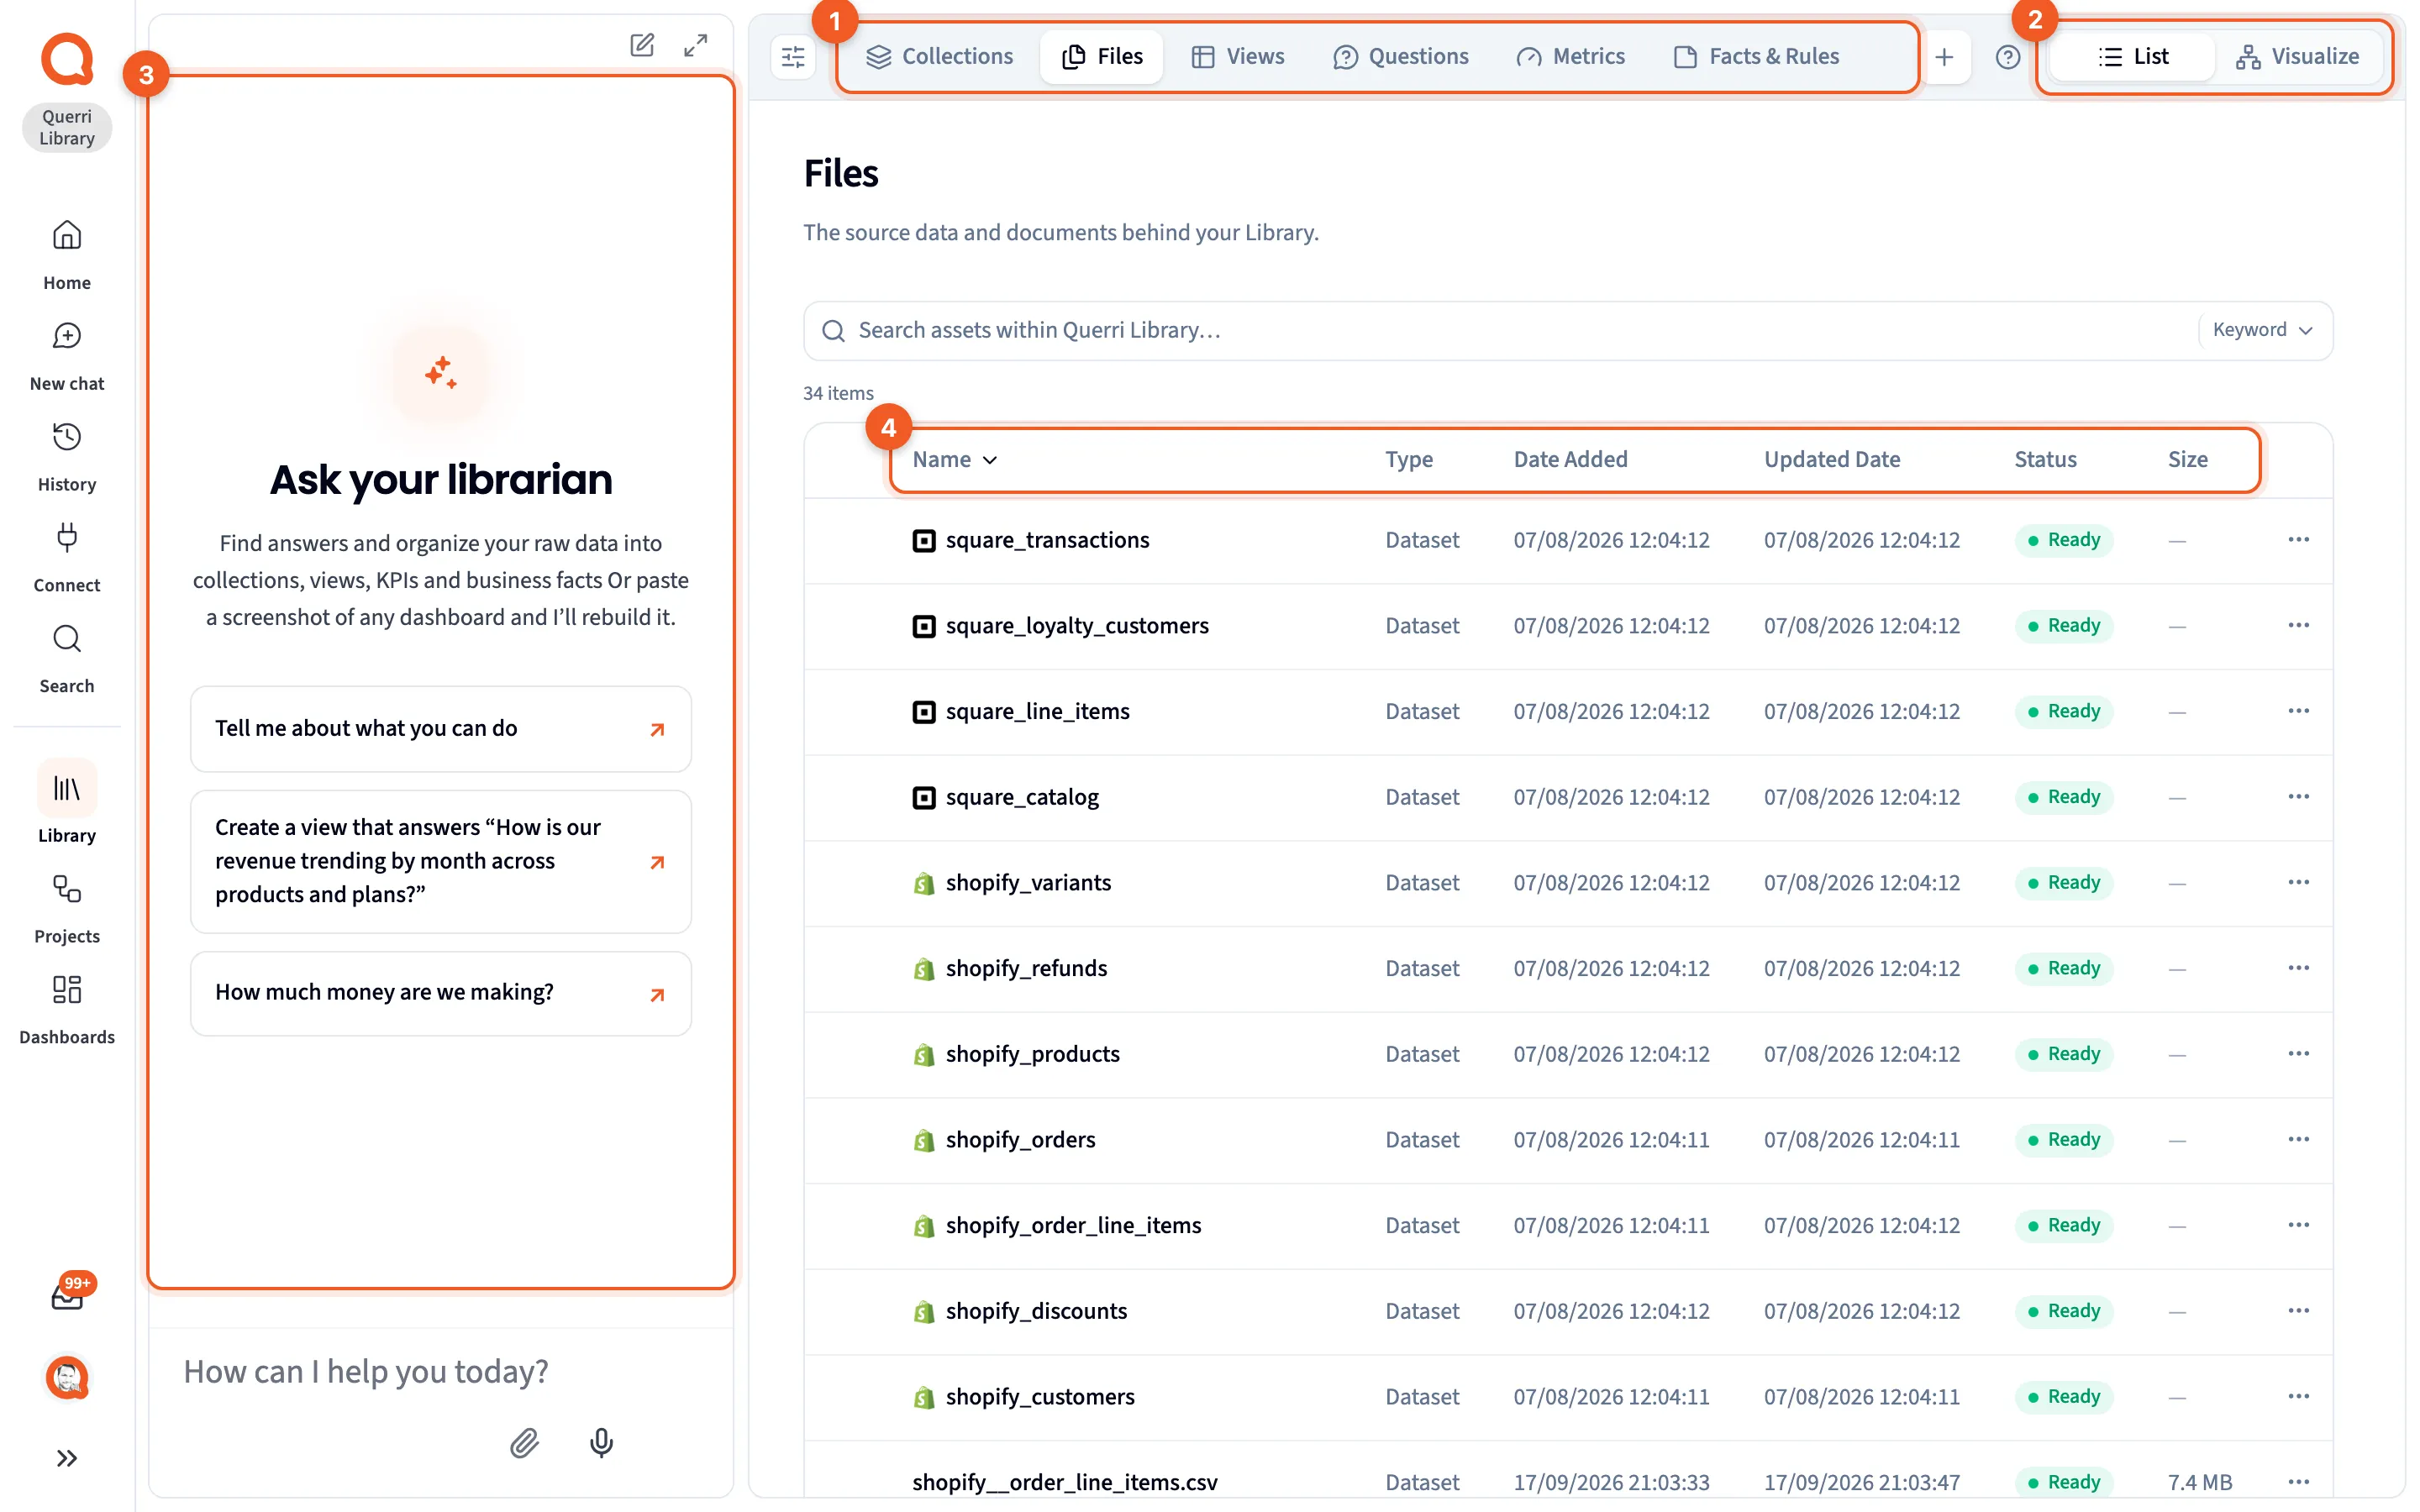
- Section tabs: switch between Collections, Files, Views, Questions, Metrics and Facts & Rules.
- List and Visualize: see the Library as tables, or as a map of the same things.
- Ask your librarian: Librarian chat, where you ask the Librarian a question or ask it to help organize your data. It’s open when you arrive.
- The Files table: the tables, views and documents in the workspace.
Open it from Library in the app rail. On day one the Files tab is simply your data, and the other tabs fill in as you and the Librarian work.
The section bar
Section titled “The section bar”
- Browse panel toggle: shows or hides the browse panel. While the panel is hidden, hover over the toggle to peek at it.
- Section tabs: each one lists a single kind of thing. The five knowledge tabs are covered in Knowledge tabs.
- +: on the Files tab, adds to the workspace. Choose New smart folder, Upload files… or Connect a data source, plus New folder when folders are turned on.
- List | Visualize: switches between the two views. Querri remembers your choice in this browser.
Short on room? When Librarian chat and the browse panel are both open, the tabs that don’t fit move into a More menu.
Visualize covers the map view.
The browse panel
Section titled “The browse panel”The browse panel sits between Librarian chat and the list. It’s hidden while chat is open, so click the toggle to dock it. Close chat and it docks by itself.
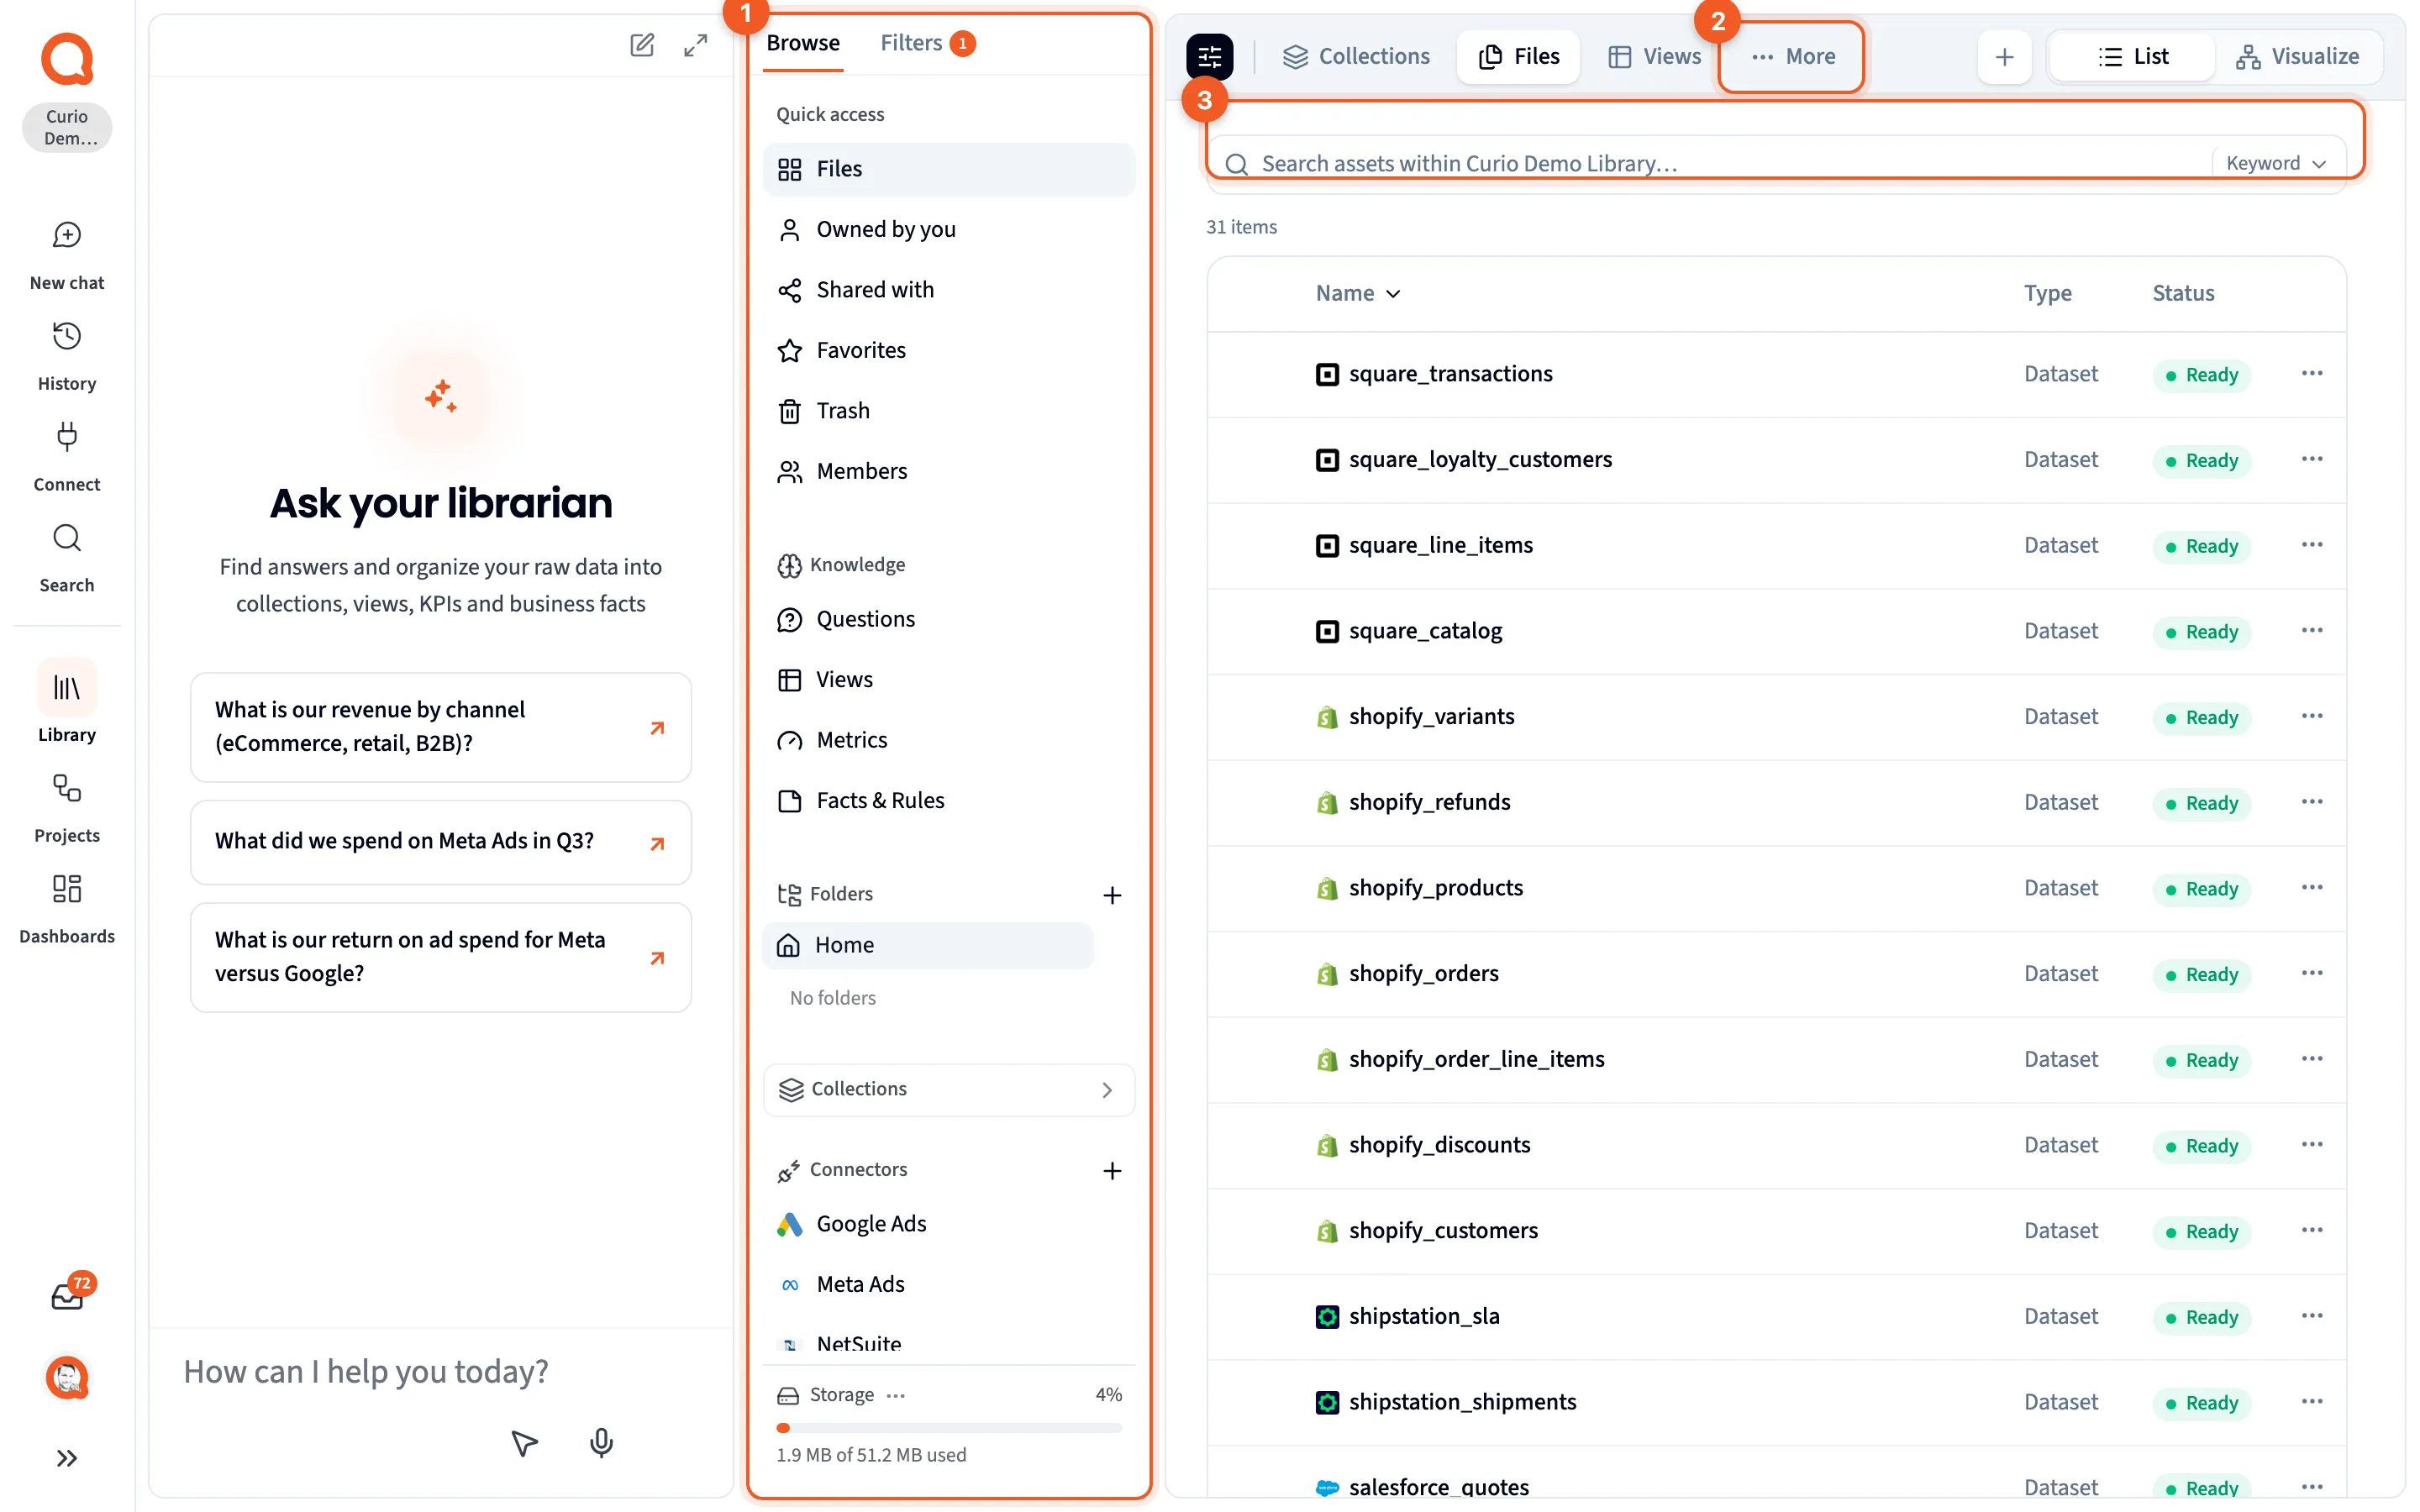
- The browse panel, with its Browse and Filters tabs. The number on Filters counts the filters that are on; here the list shows only datasets. Filters are covered in Search.
- More: the section tabs that no longer fit.
- The search box for files. See Search.
The Browse tab is split into sections, with a storage meter at the very bottom. Click a heading to fold a section away.
Quick access
Section titled “Quick access”- Files: the workspace’s files. With folders turned on, it lists only the files that aren’t in a folder.
- Owned by you: files you own.
- Shared with: two tabs, Shared with me and Shared with others. These lists reach across workspaces, so filters don’t apply to them.
- Favorites: files you’ve starred.
- Trash: files you’ve deleted. See Trash.
- Members: the people in this workspace. You won’t see it in your personal workspace. See Workspaces.
Under it, Knowledge links to Questions, Views, Metrics and Facts & Rules, the same lists as the section tabs.
Folders and smart folders
Section titled “Folders and smart folders”Home is the top of the workspace, and your folders sit under it. The + beside the heading makes a folder, and a folder’s ⋯ menu has New subfolder, Rename and Delete.
A smart folder is a saved query that’s evaluated live over your files, so what’s in it changes as the files do. Smart folders show up as rows at the top of the Files list, not in the panel. Make one with + › New smart folder, or save a search.
Collections
Section titled “Collections”Click a collection to open its page. There’s no + here, because the Librarian curates collections as your Library grows. A collection’s menu has Open, Rename, Delete and Remove from group.
Be careful with Delete. It removes the collection from every workspace and detaches its questions, and you can’t undo it.
Connectors
Section titled “Connectors”These are the systems this workspace pulls data from. A connector that needs attention shows an amber dot, or a red one when it has an error. Click a connector to list only its files, or use the + beside the heading to add data. See Sources and connectors.
When you add one, Data goes to says which workspace its data lands in, and you can change it there. It spells out who that means: “Only you will see this data.”, “Everyone in your organization will see this data.”, or “Members of {name} will see this data.”
Tags and Taxonomies
Section titled “Tags and Taxonomies”Tags show as pills. Click one to list the files that carry it, or drag files onto it to tag them. Taxonomies are category trees, and that section only shows up when the workspace has one or you’re allowed to create one.
The Files table
Section titled “The Files table”Tables, views and documents are listed together. Folders and smart folders come first, then everything else, newest first.
| Column | What it shows |
|---|---|
| Name | Click it to open the item’s detail panel. |
| Type | Dataset for a table, View for a view, or Document. |
| Date Added, Updated Date | When it arrived and when it last changed. |
| Status | Ready, Processing, Draft or Failed. |
| Workspace | Where it lives. Only shown when you’re looking at Everything. |
| Size | File size. |
Click Name, Date Added, Updated Date or Size to sort. Columns drop away as the list narrows, so with the browse panel docked you may see only Name, Type and Status. More rows load as you scroll.
Views and tables open the panels in Table and column panels. A PDF or an image opens a file preview.
Selecting files
Section titled “Selecting files”Click a row anywhere except its name to select it. Shift-click selects a range, and Ctrl-click (Cmd-click on a Mac) adds or removes one row.
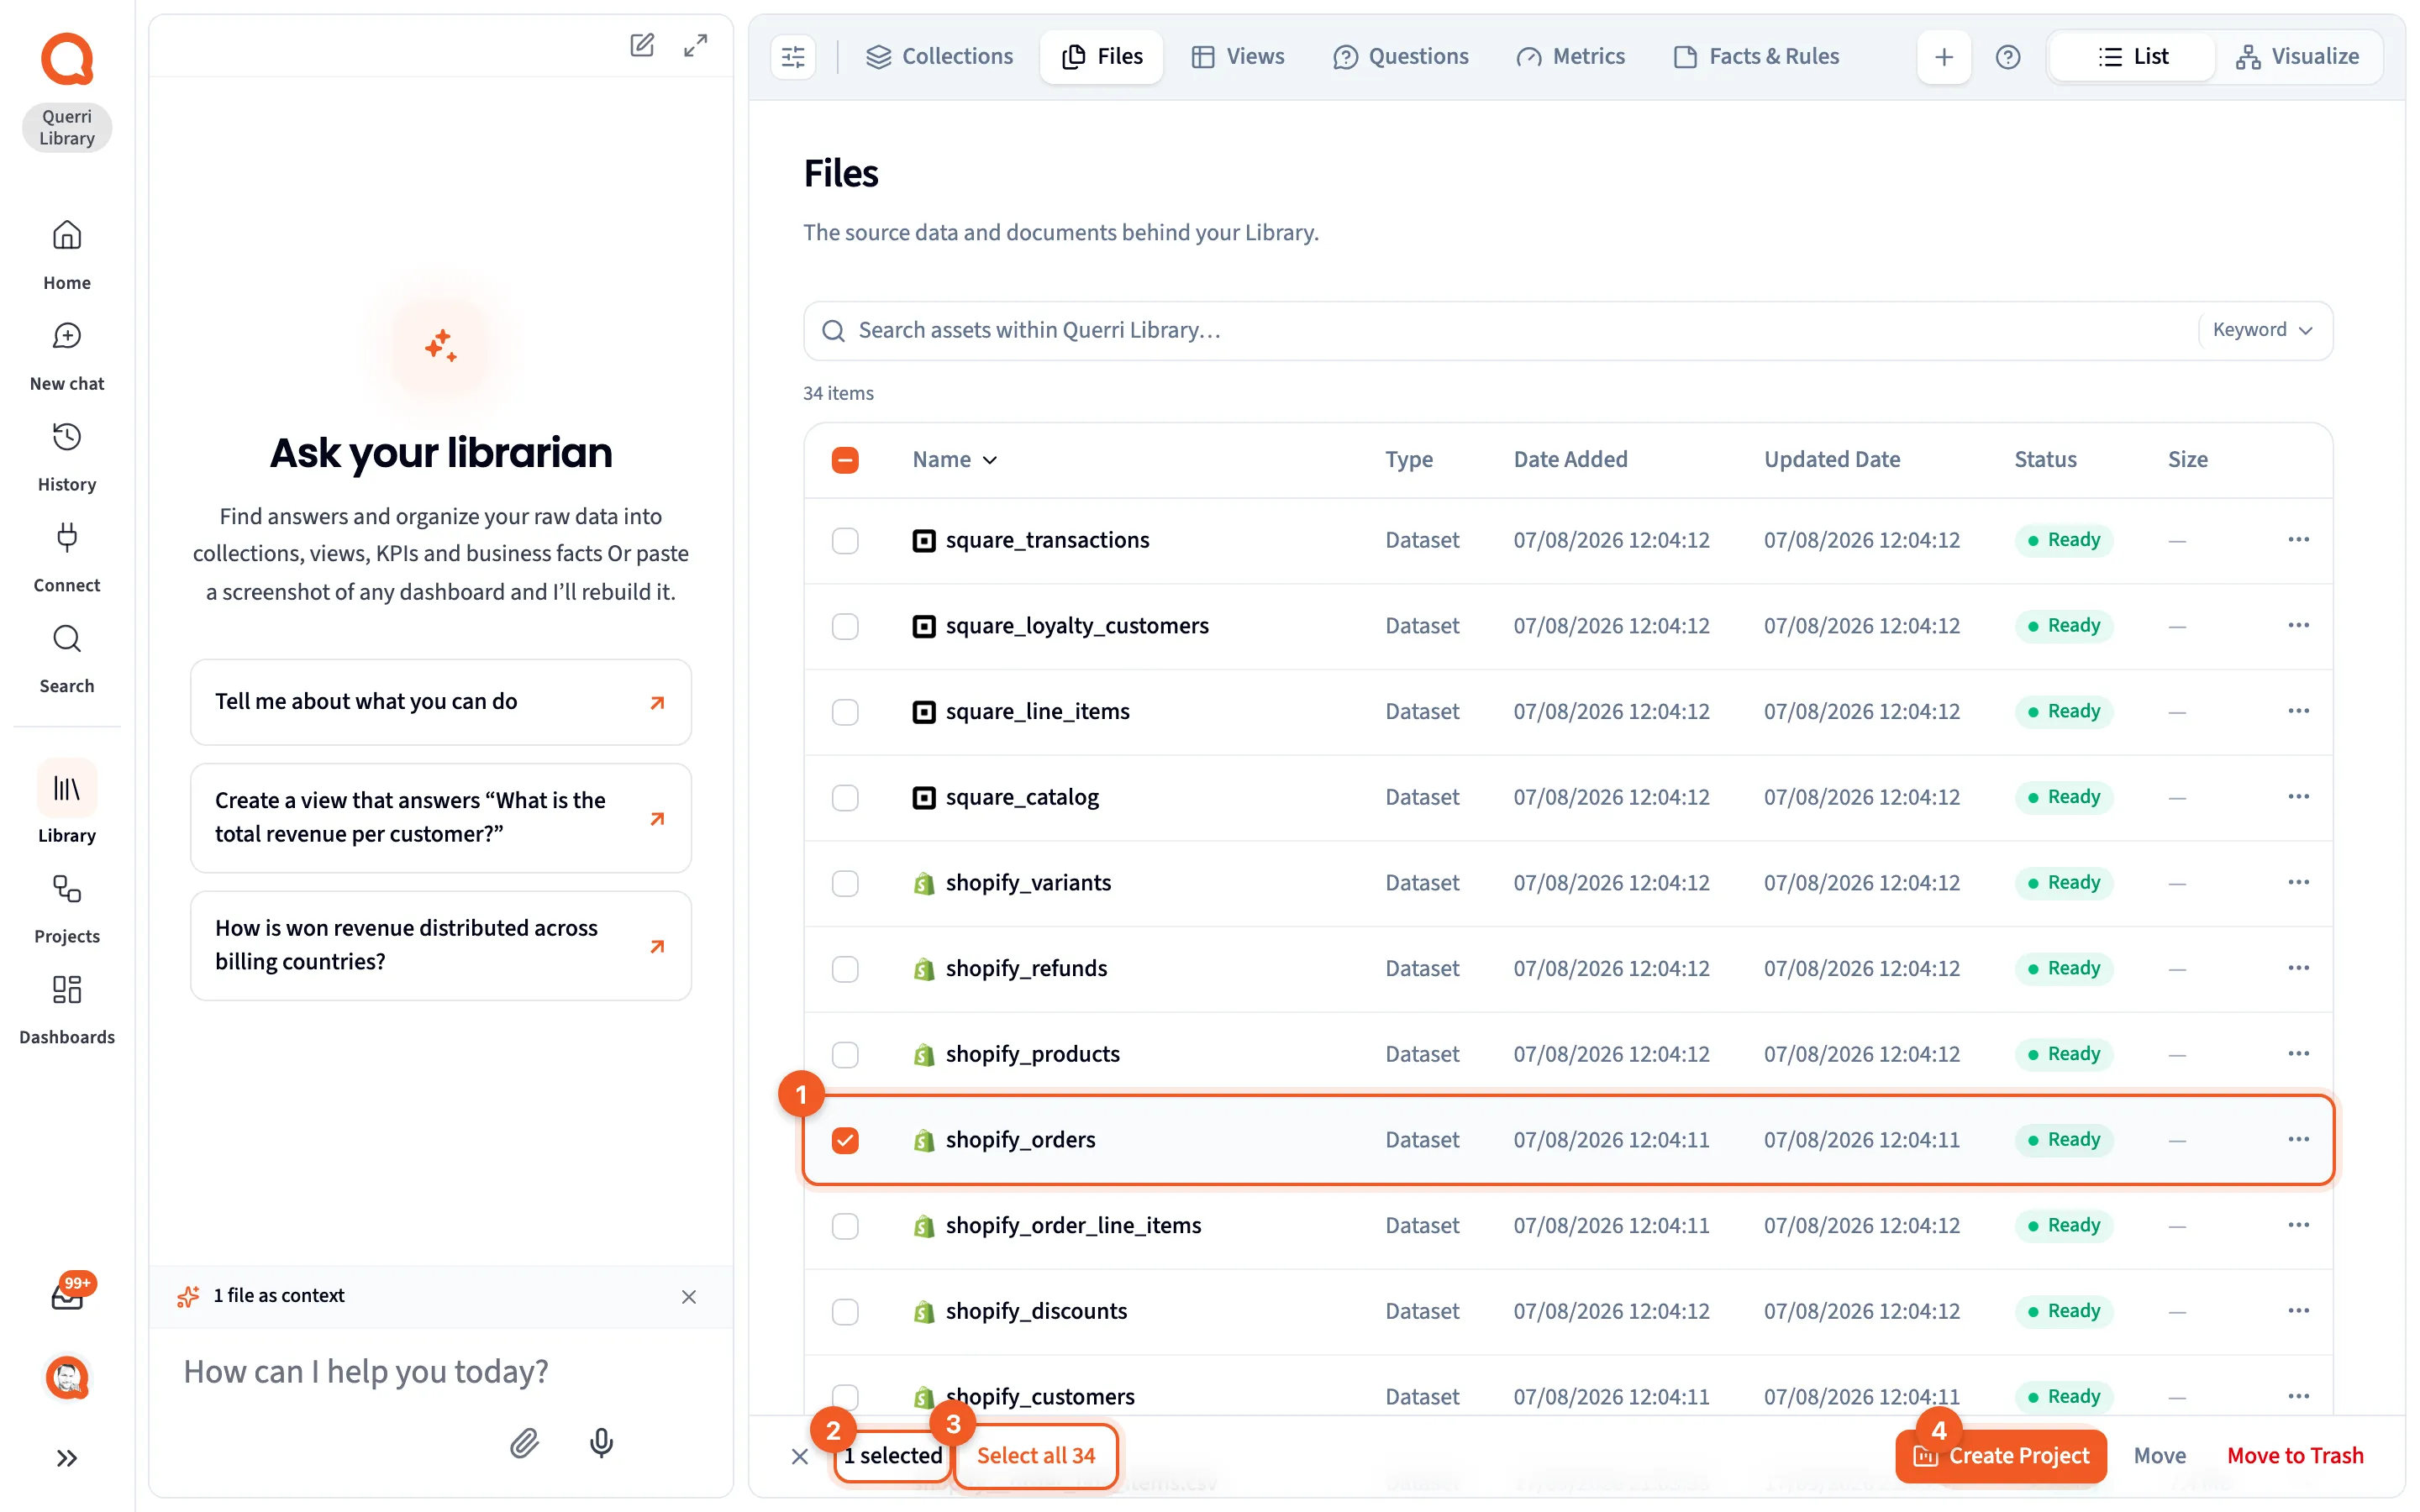
- The selected row: its checkbox fills in, and the row is highlighted.
- “1 selected”: how many rows are in the selection.
- Select all: takes in everything in the list, with the count beside it.
- Create Project: starts a project from the selection.
A bar appears along the bottom of the list. Create Project starts a project with the selected files, and Move, Tag and Move to Trash do what they say. There’s also a button to select everything in the list.
Keyboard shortcuts work too. Esc clears the selection, Ctrl+A or Cmd+A selects everything, F2 renames, Enter opens, and Delete moves the selection to Trash.
The row menu
Section titled “The row menu”Click ⋯ at the end of a row, or right-click it. Along with Open, Share…, Download, Rename and Move to Trash, you’ll find Add to favorites, Move to folder…, Add tag and Create project. Files that come from a connector add Re-sync source.
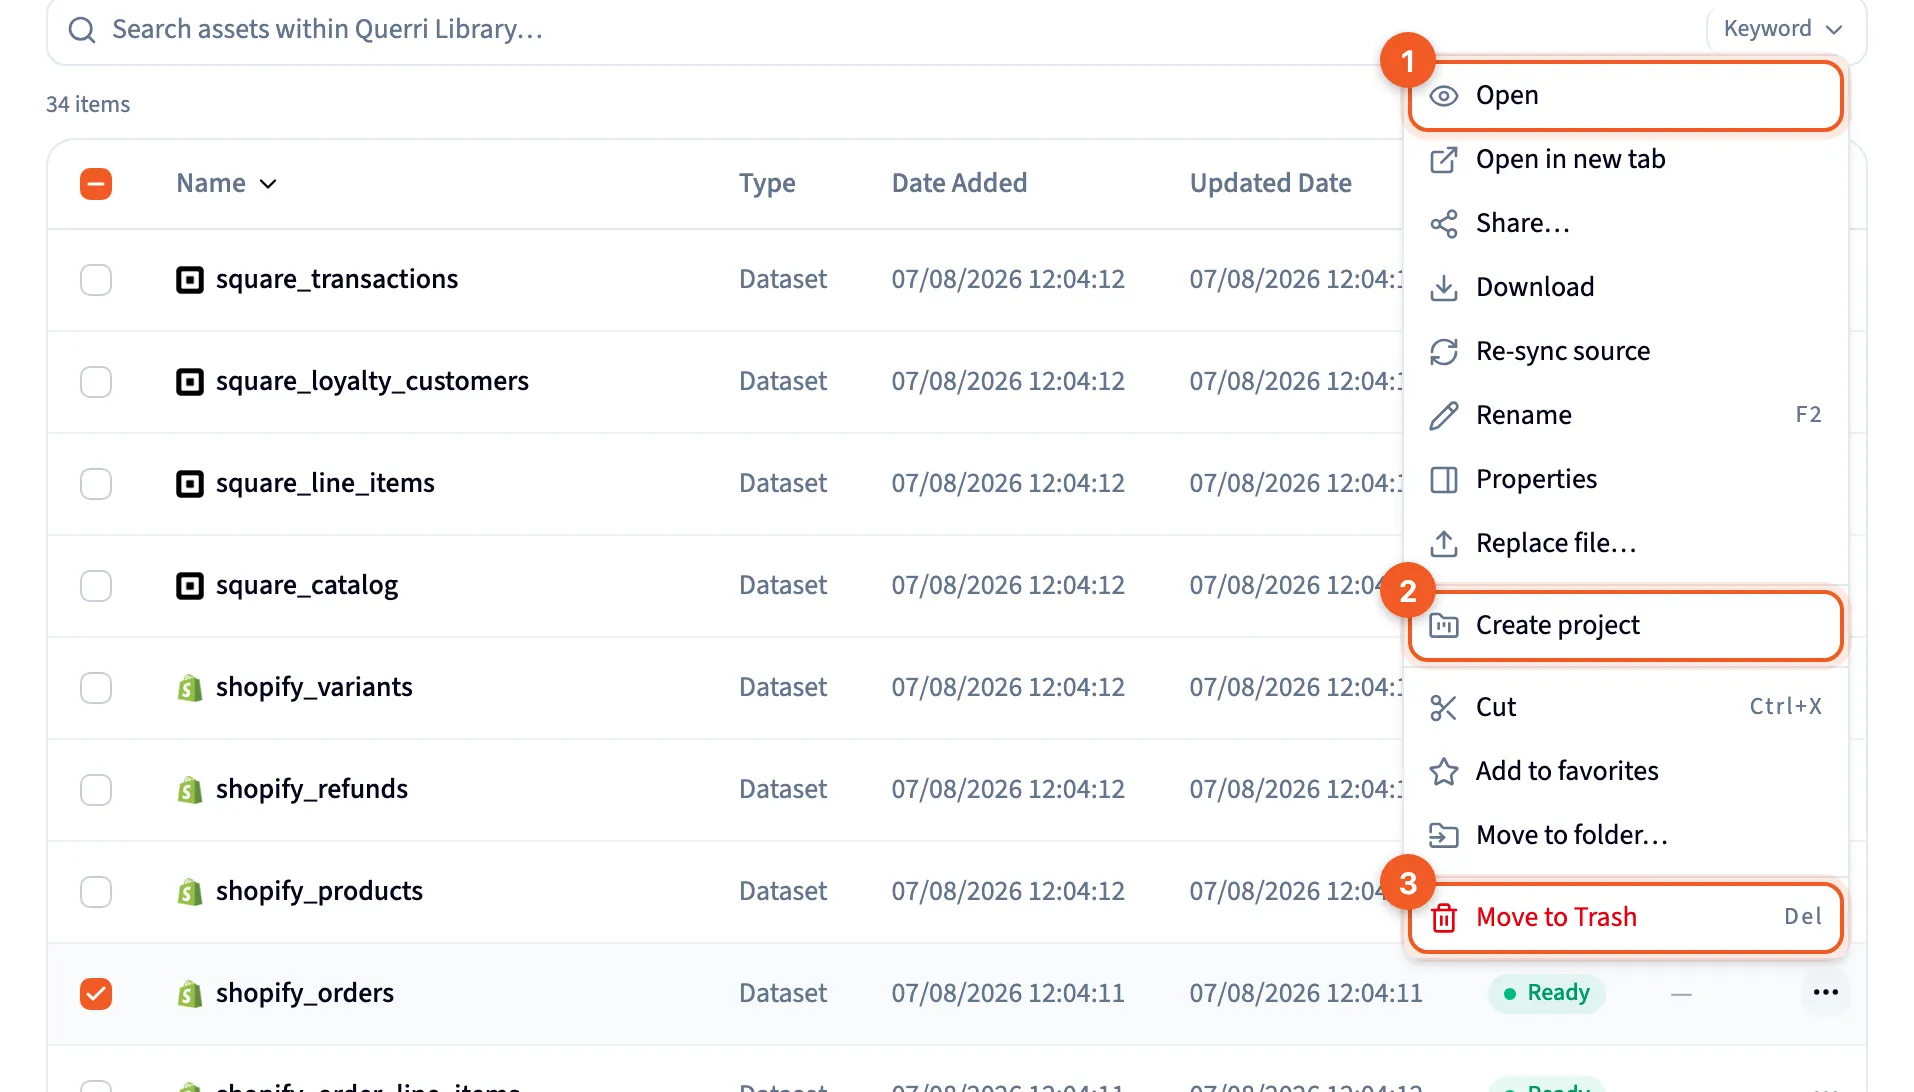
- Open: opens the item, the same as clicking its name.
- Create project: starts a project from this one file.
- Move to Trash: sends it to Trash.
A file you delete goes to Trash, and you get a chance to undo right away. Later, open Trash, select what you want back and choose Restore. Delete permanently removes it for good.
Views are the exception. A view never goes to Trash: deleting one removes its data, its definition and its place in the Library at once, so Querri asks you to confirm first.